You ever have empty cans you just don't want to get rid of...but what can you do with them????
Here's one way to use them!
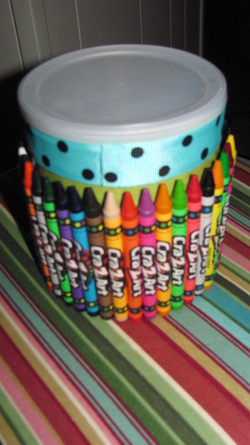
Make a Fancy Container!
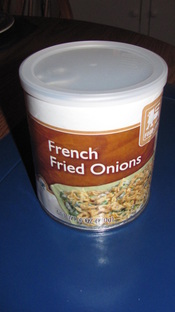
Who cares what you put in it if it's
this cute! As you can see this was a
French Fried Onions container. I
washed it out and then thought,
there has to be something I can use
this for. It came with a nice lid...so,
I decided to wrap the top in scrapbook paper. I attached it using
Modge Podge. Then I just started hot
gluing crayons to the bottom!
When I was done, I added a pretty
ribbon to the top.
Now, I am showing the lid attached....but I think I'm going to
use this for my funky pens I've been collecting for years!
But you could make several of these to store anything in. With the lid attached, it would be great for paper clips, rubber bands...anything!
So DON'T THROW THOSE CANS away! You can decorate them and use them!!
Frame for Outside Door...
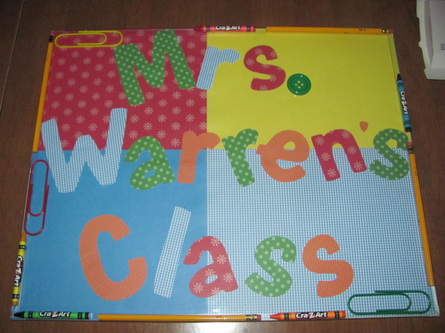
So I walked in Dollar General yesterday and right at the front was a cart that had a sign, Buy One Get One Free.....ah...yea, that caught my attention really quick. I saw some large frames that I had bought earlier in the year. At that time, they were half price, so $3. Well, today, I could get 2 for that price....woo hoo!!!
BUT....what to do with them. I decided to create a sign for outside my door. I used scrapbook paper and my Cricut. When I was done, I felt it lacked something. Sooooo, out came my glue gun and you can see how the pencils, crayons, and large paper clips add some oober cuteness to the frame. I love how it turned out!
And not bad for 3 bucks, right!?
Simple to Cover, Much Better to Look At
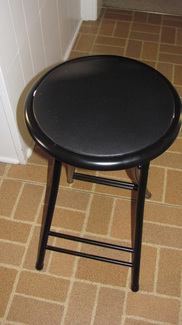
BEFORE...
So I had this bar stool, not bad looking, but with just a little colorful fabric, I made it look so much better.
It's amazing what a LITTLE fabric and do for a bar stool!
It's amazing what a LITTLE fabric and do for a bar stool!
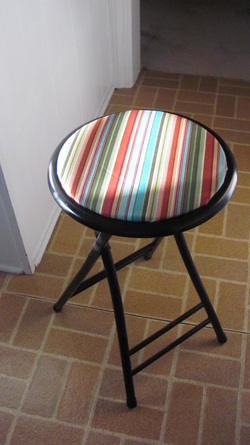
After!
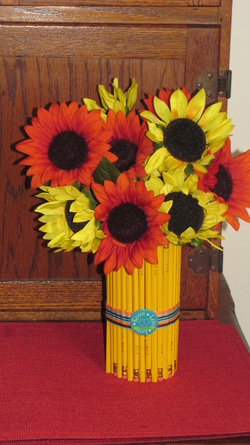
Pencil Vase
What teacher doesn't NEED a
PENCIL VASE for their classroom?!?
For this project, I took a glass that had straight sides...you know, it wasn't curved at the top or bottom, then simply hot glued pencils all
the way around.
It's NOT as easy as it sounds! It was very hard to keep the pencils straight! Then I added a cute ribbon and button and there you have it! A pencil vase with sunflowers to brighten my classroom!
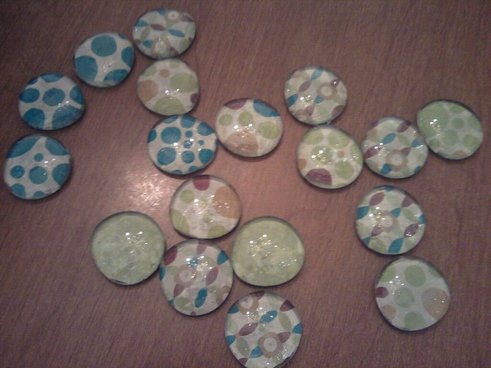
Simple and Cute Magnets!
I got these glass stones with a flat back from Dollar Tree, a bunch in a
bag. I laid one on scrapbook paper and traced the back. Then I put a
little bit of Modge Podge on the back and attached the scrapbook paper.
Add a magnet to the back and wammo! You have a custom made, one
of a kind magnet to match your classroom decor! So easy but so cute!
bag. I laid one on scrapbook paper and traced the back. Then I put a
little bit of Modge Podge on the back and attached the scrapbook paper.
Add a magnet to the back and wammo! You have a custom made, one
of a kind magnet to match your classroom decor! So easy but so cute!
Sticky Note Clipboards
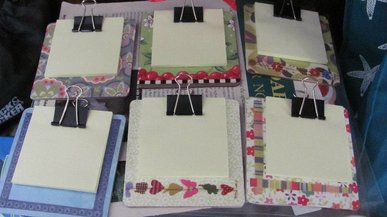
These are super easy to make. You will need a coaster. I got a pack of 8 for $1 at Michaels. They are the sturdy cardboard kind. Then get out that scrapbook paper and Modge Podge and you're set. Lay the coaster on the desired paper, trace around it and cut it out. Modge Podge the coaster and lay the paper on, then Modge Podge over that. Wait for it to dry and do the same for the back. Go over it a couple more time with Modge Podge and then add a large clip and a sticky note pad. These were gifts to my teacher friends at the beginning of the 2010 school year. They loved them!
Crate Seats
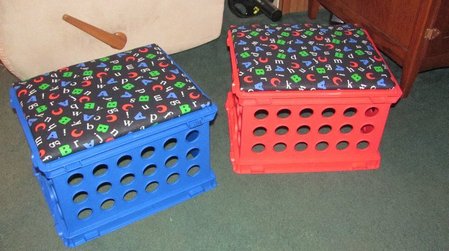
These crate seats were made using, what else, crates! If you can find a good sale, you can get them for around $2. You will also need boards cut to fit the top of the seats, where the opening is...if you measure accurately, the seats will fit right in the hole and you can use the crates for storage. UNLIKE ME...who allowed her son to measure and he measured too small and so I had to sit the seats on the bottom...but they work GREAT for seats. After measuring (CORRECTLY...LOL) go to Lowes and ask for a cheap piece of particle board. Make sure it's thick enough and sturdy to hold your students. If you tell them your measurements, they will even cut the pieces for you. Next purchase some cute material. You will also need some type of cushioning, foam works well. You can decide on the thickness. Lay your foam out, put your board on next and then cut the material so that you will have enough to fold around to the back of the board. Use a heavy duty stapler to staple the material down. Fold the sides kind of like a present so it will lay correctly. That's it. Nothing to it! I got this idea from ProTeacher.net...the next best thing since sliced bread! =)
Fancy Smancy Clipboards
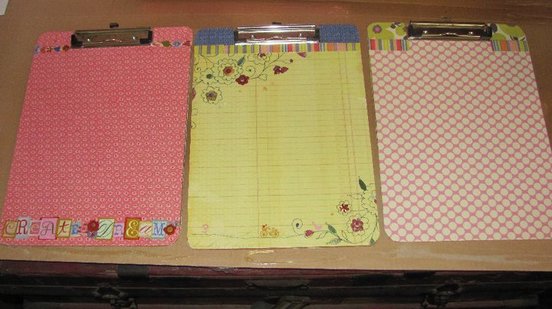
How easy are these? Way too easy...again, you'll need scrapbook paper and Modge Podge. Measure a piece to cover the front, cut out a hole for the clip to go, Mod Podge the clipboard, lay the paper down and Modge Podge it. Again, do the same for the back. When done, put a couple more coats of Modge Podge on. You can also add cutesy borders and scrapbook stuff to create an extra special clipboard.
House Rules
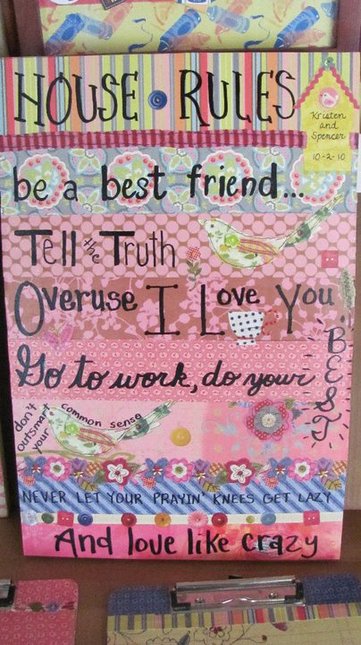
This was fun to do also. I got a board to measure the correct width for the house rules I wanted to add, got Lowes to cut it in half...I made two of these for friends who were getting married. Get that trusty Modge Podge and scrapbook paper out again!!
Decide on what you want your house rules to be, I used words to a country song, they seem to fit! I decided how many lines there'd be and then cut scrapbook paper to fit the length of the board. I Modge Podged the board and stuck the paper down.
Before I Modge Podged the paper, I wrote with a black paint pen each line, trying to use cute fonts as I went. When I had done that, I got some scrapbook borders and random cutouts and finished decorating, each time sticking them down with Modge Podge.
When done, like always, go back over with Modge Podge a few times to give it a finished look. And TA DA! You have a custom made gift that will last a lifetime...the bride will love it!
Try it! If I can do it, you can too!
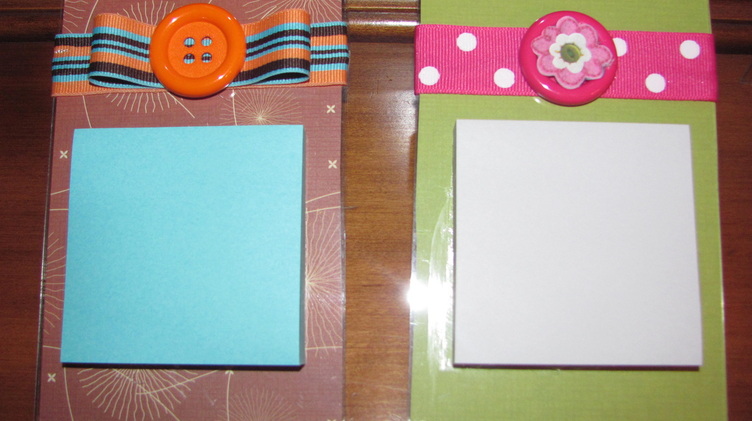
New and Improved Sticky Note Holders

These sticky note holders are even cuter than the ones I made for my teacher friends last year. All you do is get one of those cheap plastic photo frames. Mine came from Dollar General and was only $1. Next pull out that scrapbook paper again...no need for Mod Podge this time! Gather some fun ribbons and buttons and your trusty glue gun and you're all ready! Take out the paper that was in the frame, lay it down on your preferred scrapbook paper and trace, cut it out and slip in into the frame. You are half way done already!
Next choose a coordinating ribbon and button, measure around the frame and glue in place. Add a bow if you'd like. Find a cool button to add and glue that into place. Glue the ribbon on the back as well, that helps hold the scrapbook paper firmly in the frame...AND BE SURE YOU PLACE THE FRAME WITH THE TOP END FACING YOU as you glue. This way, the note holder stands at an angle.
To attach the sticky notes, I flipped them over and used a spray adhesive to stick the pad down. I used Elmers but any one will do. There you have it, cute as a button!!
Donated Notepads!

These were some notepads that were donated to me...BUT...as you can tell, they lacked that teacher appeal we all love so much...they are not cute! So, I decided to grab that scrapbook paper again and get busy!
I opened up the pad. Easy to do, it's held together with a staple...anywho, I laid it on scrapbook paper and traced. Once I had the pattern, I repeated it many times to make enough covers for all the books. I though about taking the covers off and restapling my new covers, but thought that wouldn't make it sturdy enough. I used a regular glue stick to apply glue to the paper and then just stuck them on. Once I had them all covered, I cut small strips to add something to each pad so they'd all be different. Notice in the picture, some are more "girly" and some are more appropriate for boys. I was super pleased with the project and it only took 45 minutes start to finish! I made 25 of them.
I opened up the pad. Easy to do, it's held together with a staple...anywho, I laid it on scrapbook paper and traced. Once I had the pattern, I repeated it many times to make enough covers for all the books. I though about taking the covers off and restapling my new covers, but thought that wouldn't make it sturdy enough. I used a regular glue stick to apply glue to the paper and then just stuck them on. Once I had them all covered, I cut small strips to add something to each pad so they'd all be different. Notice in the picture, some are more "girly" and some are more appropriate for boys. I was super pleased with the project and it only took 45 minutes start to finish! I made 25 of them.

Have you got a Cricut?

If not, you are missing out. Yes, they are rather expensive and the cartridges also cost a pretty penny, but in my opinion, they are really worth it. Now using scrapbook paper or cardstock, I can cut out letters to match whatever I need them to. This will be for a multiplication board. Ah, yea, I do know I didn't spell I'll right...my theme this year is owls so I played on the word. Each student will have an owl with their name on it. There will be a tree stuck to the wall that I will cut out of contact paper that has a wood pattern. Each branch will be labeled 0-12...when they master that each set of facts, their owl will move up in branches til hopefully all of the owls are at the top of the tree!
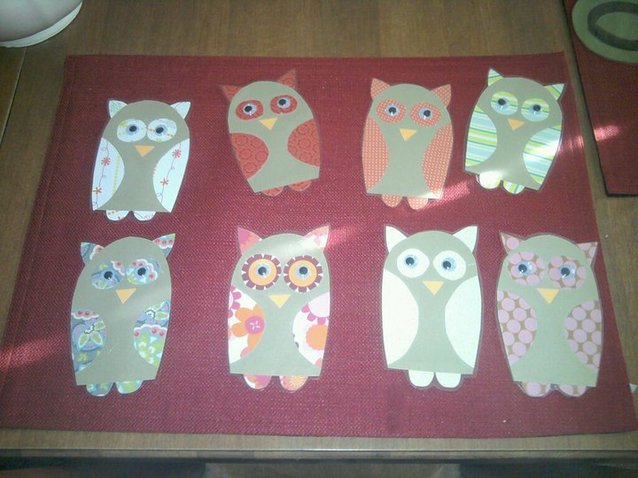
Here are the owls I made from scrapbook paper to go on the board I talked about above. I made a pattern for the body but for the ears, eyes, feet, and wings, I just cut freehand from different paper. Adding googly eyes makes them so much cuter!
